Before You Leave!
Watch Some of The Latest Videos


The Ultimate Review of New Zenler Learning Platform is an in-depth analysis New Zenler. In this comprehensive review, we will explore the features, functionality, and benefits of New Zenler. This review will help you make an informed decision about whether New Zenler is the right fit for your needs.
If you're considering New Zenler then you're in the right place. In this article we'll cover the features offered by New Zenler for us course creators.
Zenler is a comprehensive course creation and delivery platform that offers a wide range of features and capabilities.
With Zenler, users can create fully-featured online courses with various content types such as videos, audio, PDFs, quizzes, and surveys.
The platform also allows for the creation of drip schedules and visualizing course funnels. Users have the flexibility to set any pricing for their courses, offering one-off courses, subscriptions, free trials, and payment plans.
Zenler also provides marketing and lead generation tools, including various types of marketing funnels, high converting designs, and marketing automation sequences. Users can generate leads and build their email list, with pre-loaded email sequences for high conversion rates.
The platform offers built-in email automation and analytics, allowing users to send automated emails based on triggers, segment their contacts for targeted messaging, and track mail opens, clicks, and unsubscribes.
Zenler also provides a drag and drop page designer for easy customization of pages, with unlimited elements and a library of 1000+ premium design blocks.
Additionally, Zenler offers community engagement and live interaction features, including a social network-style community and a live chat room to enhance student engagement.
Overall, Zenler is a comprehensive platform that offers a glimpse into the future of course platforms with its wide range of features, support, and free getting started option.
My goal with the review of New Zenler is that I will be able to answer all of your questions, and help you decide whether or not New Zenler is a good fit for you.
First off, full disclaimer: I am an affiliate for NewZenler and I will get a commission if you decide to purchase New Zenler through my affiliate link. You will receive the same price regardless.
I only promote products that I believe in 100%. In fact, I'm a paying customer of New Zenler and I use it to host all of my online courses as well.
What this means is that being an affiliate does not affect my recommendation in any way....since I use the product every day. In fact, it makes me a little more critical about the product because I use it on a daily basis.
It also means that if you purchase through my link on this page, you'll get access to some incredible bonuses.
The bonuses are made with you "the course creator" in mind.
I know what it's like to be a course creator and I want to make this an easy decision for you. These bonuses are not available anywhere else and cannot be purchased separately.
Whether you're switching from another platform or brand new to course creation, New Zenler is a super strong contender in this space.
If you're ready to take the dive you can do so by clicking the button below.
Zenler has two different plan types i.e. Pro & Premium.
Zenler Pro Plan monthly plan is $117/Month and the annual plan is $1164/Yr.
Zenler Premium Plan monthly plan is $347/Month and the annual plan is $3324/Yr. Check out the in-depth pricing here.
Let's dive right in and walk through all of the features New Zenler has to offer.

Everything starts with Courses. So let's cover this part first. Here's a look at my courses dashboard. I have 3 courses listed here. You can see the name of your courses and also the course cards. Once you click on a particular course card it'll take you inside the course details with more options.
For this New Zenler review, I'm going to click on the course titled "New Zenler Step By Step Tutorial". This is where I am housing all of the instructional videos about how to set up and use New Zenler.

After clicking on the course card I am presented with more options.
For those of you who are familiar with creating courses on other platforms, this screen will look pretty familiar.
Here's a side by side comparison of course creation screen between Teachable & New Zenler.

New Zenler Course Creation

Teachable Course Creation
Once you click on the course card you will be able to see a quick snapshot with high-level details about that course.
I've put a screenshot here of my other school.
This one has a lot more data currently than my New Zenler school.

The reason why you're seeing only $13.6 in here is that at the time of writing this New Zenler review I'm using Thrivecart. This was an option I chose since I had purchased a membership to Thrivecart a few months before New Zenler came along.
You DO NOT NEED a separate check-out cart. Being an All-In-One Platform, New Zenler is more than capable of handling check-outs and collecting payments. In fact, I will be moving all my payments to New Zenler soon for my school.
Full featured free trial. No Credit Card Required. Create your free school today!
If this is your first time logging in, you will of course not have any data on your dashboard.
If you've moved your courses from Teachable or Thinkific using the magic wand i.e. support@zenler.com, you might see some data in there. The Zenler support team will move all your content for you.
Getting back to the course details tab. This is where you can make high-level changes to your course such as:

Assigning categories is a neat way of organizing all your courses. To create new categories simply click on the "Manage Categories" link right from the Course Details tab.
If someone were to visit your category URL this is what they'll see.

This houses all your course content. Essentially this is the core of any course. From the curriculum tab, you will be able to add content to your course.
The following lesson types can be uploaded into the curriculum area:
Each time you add a lesson within New Zenler there are few other options as well. For that particular lesson, you can:

Click on the add lesson button to add content within any lesson.

After you've finished adding content to your course and are ready to release it to the world, simply click on the "Publish Course" button in the top right corner of the Curriculum tab.

Now you're off to the races, well kinda!
Next, let's add a pricing plan to your course so can start making some moolah.
Head on over to the pricing tab on your course detail page. Here you can add one or more pricing plans for the same course.
Simply click on the Add new plan button. You will be presented with 4 different options i.e.

All of these are pretty self-explanatory. So I'm not going to bore you to death with every one of them.
I've selected the one-time purchase option. On this next screen, you can select the pricing for your course and some other pertinent details.
Note
One important and obvious thing to note here is that all prices have to be in the same currency. Which means you cannot have one pricing plan in $$ and another in ££ for the same course.
My all-time favorite feature of the pricing plan is tiered pricing plans.
This allows you to make parts of the content available within that course for that price. This sounds more complicated than it is. You can find more information about tiered pricing plans here.

One last thing before saving your pricing plan is to decide whether you'd like to connect this pricing plan to a community!
YES COMMUNITIES! As in plural! As you, you can create as many communities as your heart desires.
You can create a community for each course and also a site-wide community. You can even attach communities to your membership site i.e. bundles.
Bundles can 100% be used for your membership sites. If you'd like to see what a course experience and community looks like, you can enroll in my free course.

When you're creating a pricing plan, you will be prompted to select a community. Note that one pricing plan can only be attached to one community in New Zenler.
Full featured free trial. No Credit Card Required. Create your free school today!
Now that you have your course created (or imported) and pricing plan in place, it's time to design a kickass sales page. This is where the power of New Zenler comes in. Their page builder is very intuitive and easy to use. It's a simple drag and drop builder that packs a punch under the hood.
Let's head on over to pages and see what we can build!
Every course in New Zenler comes with a 4 step funnel of pages. This visual funnel also shows you visitor stats on each of those pages.

As you can see from the statistics, I have a 489% conversion rate on my sales page. This obviously isn't possible.
The reason why these numbers look so bloated is that it's for my free Step-by-Step course on how to use New Zenler.
And when I share the link for this course within the New Zenler Facebook Group, I usually just share the checkout page URL with everyone.
So the system is thinking that since I have so many people enrolled in the course, that they all must have come from the main sales page which is step one of this funnel.
If you were doing this in a manner where a visitor first lands on the Sales page of your course and then moves on to the checkout page, then the numbers would make more sense for you.
I wouldn't get too hung up on these statistical numbers, only because there are so many ways people can end up at your check-out cart. So take these numbers with a grain of salt. If you're serious about your analytics then I'd recommend adding your Google Analytics ID within Zenler.
Back to the page editor. Now, there is a LOT on this page editor to cover. I won't be able to cover EVERYTHING possible in this post. However, feel free to enroll in my step-by-step course to see how this editor works.

This is what the page will look like once you go in edit mode. In the top left corner of this page, you'll see blocks, elements, and pop-up.
Blocks are like building blocks that are used to build your page.
There are over 1000+ pre-made blocks available within the New Zenler page editor.
If you don't care about the pre-made blocks, then you can always insert an empty block to make it your own.
Each of these blocks contains pre-made templates (except for the empty block).
You will see in the video, it's as easy as building a lego set. One block at a time!
Once a block has been added to the page, everything within that block can be customized to meet your brand needs.

Default Checkout Page
Moving down the funnel, you have your check-out page. Just like every other page, this page is also completely customizable.
This is what the default check-out page looks like out of the box.
Using New Zenler's page editor, all aspects of the checkout page can be customized to meet your needs.
The idea is to keep things simple on your check-out page. I can speak from experience here that the more things you add to your check-out page, the more your conversion will drop.
But you can customize it to the way you want so it matches your brand standards.
The tracking code option is available on the check-out page as well. This is where you will add your Facebook Pixel ID and Google Analytics codes.
Now you can re-target your visitors who make it to the check-out page but don't make it to the thank-you page.
New Zenler has finally introduced order bumps. Now you can add a one-time upsell to your existing check-out cart. Here's a two-step process of adding order bumps.
Step 1: Click Add Order Bump on your checkout page

Thank you page
Step 2: Edit and design your order bump to your liking

Thank you page
Here's a comprehensive tutorial on how to use order bumps.


Thank you page
Once your students have made the purchase, they're brought to the thank you page. Here they can click on the Continue to Course button to immediately get started with the course.
Note
Even on the basic plan i.e. the Pro Plan, you get unlimited courses with unlimited students and 100 marketing funnels (which is as good as having unlimited marketing funnels). Click here to create your free account today and take Zenler for a spin.
The final page in the funnel is the course access page. This page houses your course curriculum. There are two types of curriculum blocks you can insert here.
Collapsed Style Curriculum Block: This kind of block would come in handy if you have a lot of lessons under your sections. It'll present the curriculum fully collapsed while only showing the section headers.

Collapsed Curriculum Block
Expanded Style: On the contrary, the expanded style will show all of the sections fully expanded. This could come in handy if you don't have a ton of lessons under each section of your course.

Expanded Curriculum Block
Countdown timers are a great way to create a sense of urgency. Some third party countdown timer apps can increase your learning curve. Instead of going through the tedious process of understanding a new software, with New Zenler, we get built-in countdown timers in one easy platform.
This truly makes Zenler an All-in-one platform for online course creators. That's one less monthly subscription to pay for.

After adding the countdown timer to your course sales page or your marketing funnel page, you get to choose what should be the expiry action. So essentially, where would you like your leads/visitors to be redirected once the timer has run out.

Marketing funnels are a super powerful feature set of New Zenler. As of the writing of this post, you can create two different types of marketing funnels i.e.

As the name describes, this funnel is going to be the most commonly used funnel type IMO. A lead magnet funnel is the traditional online marketing term for a funnel where you're collecting leads by giving away a lead magnet.
And that lead magnet can be anything from a free pdf to a free course and everything in between. Traditionally a PDF is used in exchange for an email address.

Step 2 of the lead magnet funnel, setting up your "freebie download"
The best part about these funnel types is that you don't have to connect them to an external email service provider to deliver the "lead magnet". All of that can be handled seamlessly within New Zenler. You can use the built-in email marketing to deliver your lead magnets.

Final step - picking your lead magnet template
Just like with pages, all of these templates are fully customizable.
A video series funnel allows you to collect emails in exchange for short videos that drives towards the end goal of selling your core product.
You can add up to 10 videos within the video series funnel. Each video becomes a step in that funnel and gets it's own unique URL.
This URL can then be used within automation to deliver each video on its very specific day i.e. Day 1, Day 2, Day 3, so on and so forth.

Note
You can change the URL by clicking into the URL box.
I cover both of these funnel types in-depth in my free New Zenler Mastery course.

Video marketing funnel templates

The crux of any good marketing platform is its ability to communicate with people.
And with you New Zenler you can do so with the built-in email marketing.
Pro plan users get 100,000 emails per month. The email send quota resets at the beginning of each month.
The quota doesn't carry over. So if you used only 50,000 emails this month, next month your credit won't be 150,000.
However, you can bring in your SMTP provider if you're looking to send more than 100,000 emails per month.
For most people, the 100,000 emails/month quotas should be sufficient. But if you find yourself running out of this quota each month then I'd recommend bringing in your SMTP.
The process of bringing your SMTP can be a little technical. I'd recommend watching some YouTube videos on how you can do it.
The Email Broadcast tab will take you straight to the email broadcasts page. From here you can schedule broadcasts to your mailing list.
New Zenler allows you to filter your recipients using a variation of AND/OR operators. For example, you can filter contacts/leads that are Enrolled in a Course AND have a specific tag:

AND/OR Filter in New Zenler
Once you have selected which recipients you would like to send this email to, the next step is to create the content of your email.

If you've worked on any email marketing platform, then this screen should be quiet familiar to you.

The final step is to either schedule or send your email to those recipients that were selected in step 1.

And just like that, you've scheduled and sent your emails right from within New Zenler.
What the heck is email authentication?
When you send an email, you want the person who receives it to know that it's really from you, and not someone pretending to be you. Email authentication is like a secret code that helps the person receiving your email know that it really came from you.
It's like when you have a special handshake with your friend, and only you two know how to do it, so if someone else tries to pretend to be your friend and do the handshake, you'll know it's not really your friend.
Email authentication works the same way, by using special secret codes to make sure that the email really came from the person who says they sent it.
This is more of a reputation management piece. It could get a little technical on how to implement this. The New Zenler support team has done a great job of detailing out a support article on how to set this up.
Here's how you can set up email domain authentication.
Step 1: Go to Site Settings and click on Custom Domain
Step 2: Click on Email Domain Authentication
Step 3: Click on Proceed
Step 4: Copy/Paste the CNAME records in your domain registrar and then click verify in New Zenler
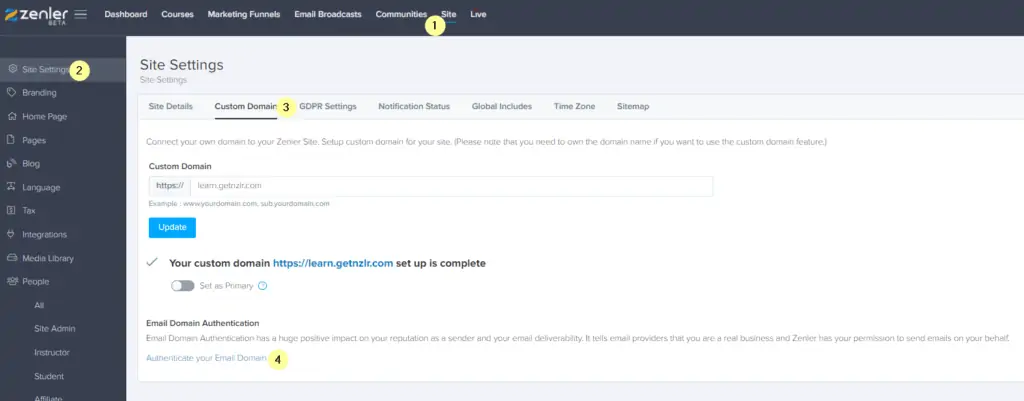
Step 1

Step 2
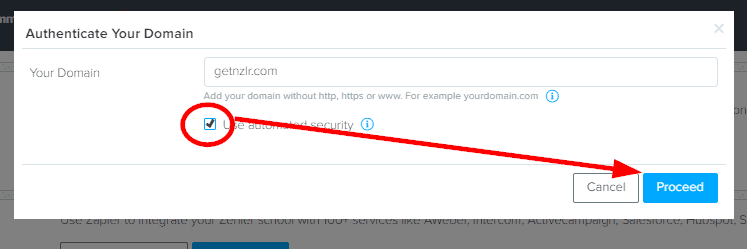
Step 3
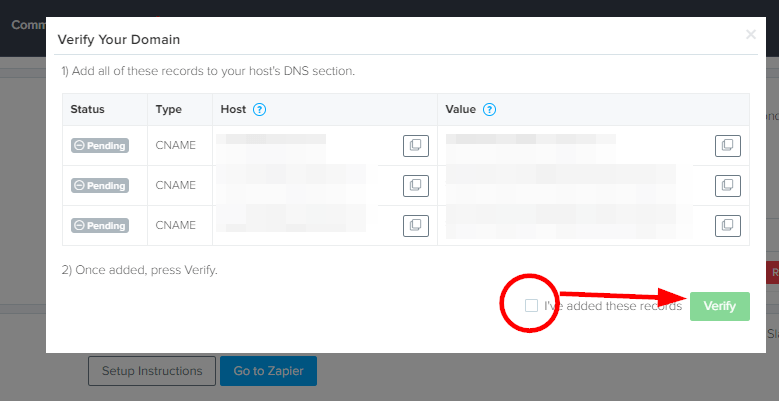
Step 4
They say that your students come for the content but stick for the community. And New Zenler makes it easy to add communities.

I have an in-depth post on how communities work. You can check it out here.
With communities, the best part is that you can create as many as you'd like.
For example, you can have one for the entire site, and one just for a particular course, or one just for a particular pricing plan.
Maybe you only want to offer a community to students who are on a monthly subscription plan but not to those who are on the one-time payment plan.

All of that can be controlled right from the Community tab.
In my humble opinion, this feature puts New Zenler in a league of its own.

Now for the MOST IMPRESSIVE feature of New Zenler - Live Webinars. New Zenler continues to outpace itself with some world-class features.
And their answer to the latest pandemic is the integration with ZOOM.
This integration was slated for the tail end of 2020 as per Rakesh.
But due to the demand in remote work tools, New Zenler team moved mountains (okay maybe not that dramatic) but they put in a lot of man-hours to bring us this kickass integration.
As of the writing of this post, New Zenler directly integrates with Zoom.
If you're on their pro or premium plan then you should have access to this feature.
And I say "should" because it is being rolled out in waves.
I was one of the lucky ones to get early access to test it out.

You can watch this video on how this integration works. It is pretty seamless.
On the Pro Plan, you get 300 attendees per session and you also get 100 sessions per month.
That is a LOT OF SESSIONS! So Zoom your heart out, course creators.

The Zenler team has officially launched 1-1 Zoom sessions. This means you can finally ditch your Calendly and Zoom paid accounts for good ????
To get access to the 1-1 Bookings feature you will need to be on the Pro or Premium New Zenler plan. Here's how the 1-1 bookings work.
STEP 1 - Go to the Live tab and create a new 1 - 1 Booking
This is where you will be able to set up your 1-1 bookings. This is a new addition to New Zenler. The 5 options available to course creators today are:
1. 1-1 Bookings
2. Live Class
3. Live Webinars
4. Live Interactive Webinars
5. Live Stream

STEP 2 - Select your session details and theme
You will not be able to see your 1-1 booking link till you pick a theme.

STEP 3 - Add your schedule
Here you will get to pick the times you want to make yourself available for the 1-1 bookings in New Zenler.

STEP 4 - Get your registration link
For the 1-1 bookings, you have two options within New Zenler. Option one is to get the Registration URL so folks can go register for the call. Option two is to give them a direct link.
Note: Since this is new functionality there might be some minor bugs/glitches for now. The other thing to call out is that currently users have to go through the registration process i.e. create username and password, in order to complete the 1-1 booking in New Zenler.

And there you have it! That is how you can use the 1-1 booking functionality in your New Zenler school. If you don't have a pro account yet, you can create a free school to test out New Zenler.
Full featured free trial. No Credit Card Required. Create your free school today!
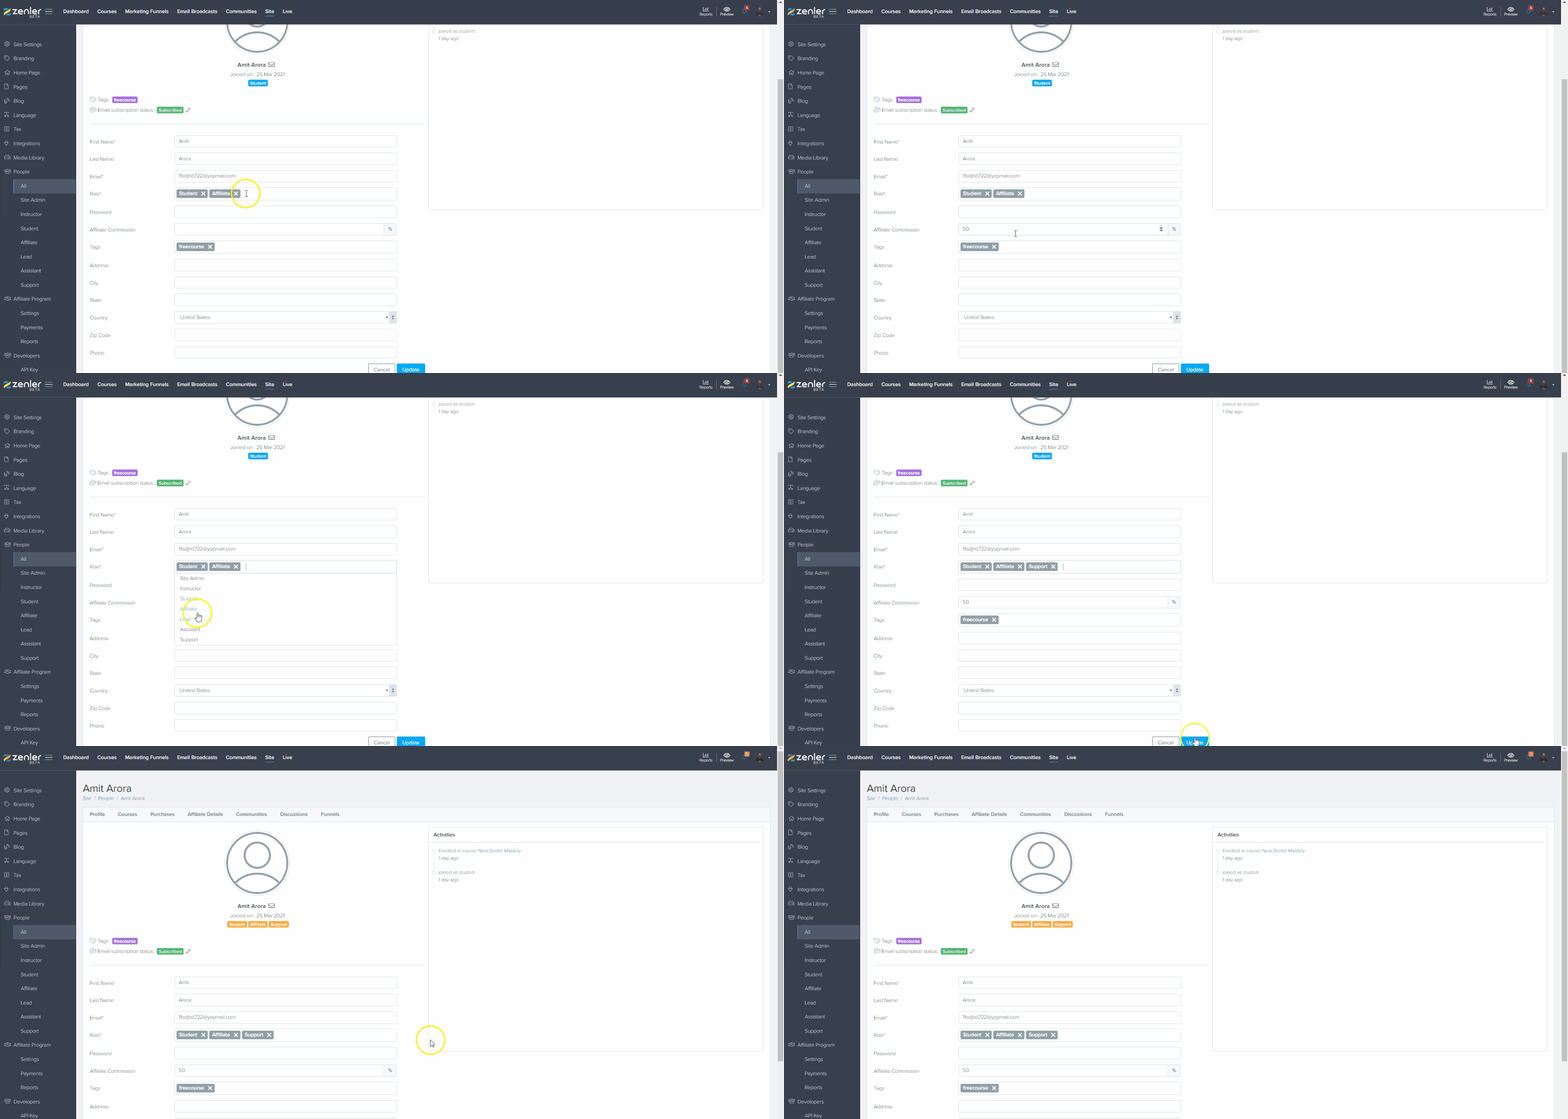
Part of this New Zenler Ultimate Review I'd like to cover how to assign Roles to people in New Zenler.
Below is a quick video on how to add assign roles to a person in New Zenler.
Understanding Roles
Below is a role matrix that will help you understand these roles better.

Absolutely 100% YES! New Zenler is more than just a website builder. You can blog, host your course, create communities, deliver webinars, create marketing funnels, and more. I have built countless websites for myself and my clients, on New Zenler.
You can download all your videos from the media library in your New Zenler school.
I would say that nothing is a 100% guarantee in this world. That being said, I have complete faith in New Zenler. I have been hosting my course on New Zenler since May 2019 with ZERO downtime or login issues.
As of October 2022 New Zenler is still in beta, Yes. Which in layman's speak means that they are going to continue to develop the product, to make it better. And by being in beta, they're able to offer more features than any other LMS for a fraction of the cost. So open your free school today.
Yes! New Zenler has a very generous free tier. You can find more about the free plan here.
Now for the best part of being part of the beta group. INSANE PRICING! And I'm not just saying this to say it. It truly is insanely priced. I got in at the lowest level tier of $337 back in 2019.
As of the writing of this blog post, the price is $1164/Yr or $117/Month.
Annual Beta Price $1164/Yr
If you are wondering how this compares to the competition, you can check out the blog post below.
The ultimate comparison > Teachable Vs. Thinkific Vs. New Zenler
Some Social Love


All Bonuses will be delivered after purchase confirmation
Grab This Lifetime Offer Through My Link And Claim Your Bonuses:

Awesome Bonuses Just For Buying New Zenler Through My Link. No Extra Cost To You
But Wait...There's More!
I want to make sure you're going to be successful on day one of starting with New Zenler. So I want to add a few more things, things that I wish I had when I was starting in the online space.
10
I have created step-by-step tutorial videos on how to use New Zenler. This will cut your learning curve in 1/2 and teach you how to do advanced ninja level stuff with your sales pages.
Combined with the power of drag and drop blocks along with these tutorials, you're sure to be on your way to success!
11
I've created a private community just for my Zenler VIPs. For those who purchase their New Zenler subscription through my personal link. In this private group you will get access to me and like-minded course creators.
New Zenler Pricing
Free Trial
Request invite to start your school for free.
Pro Plan
New Zenler Pro Plan Includes:
$647 per year
Beta pricing is honored annually
why get New Zenler through me?
Amit Arora
First off, thank you so much for stopping by! I hope you've seen the video and got to know me a little by now. I started my course creation journey in 2015 when we had our 1st baby boy. My wife was home on maternity leave and we came up with the idea to create an online course while she had the time off from work.
Four years later....
Copyright 2020 by GetNZLR, all rights reserved.