So you just finished a course launch and need to take a break between now and your next launch. But you don't want to clone your course to do this.
In this post, we'll discuss how to set up a waitlist funnel in New Zenler using your existing course sales page.
We'll cover the following things in this post:
- How to close the sign-ups for your existing New Zenler course
- How to create a waitlist for the next launch
- How to re-open your course with a higher pricing plan
Task 1: Close Sign-ups for your current course.
You might already have the course open to all the people with the pricing plans. This enrolment opportunity will be closed so that new students cannot join the course. This is not a mandatory step, if you don't have the course already launched, you can skip this part and move on to the next task of creating the waitlist.
Step 1: Deleting the pricing plan.
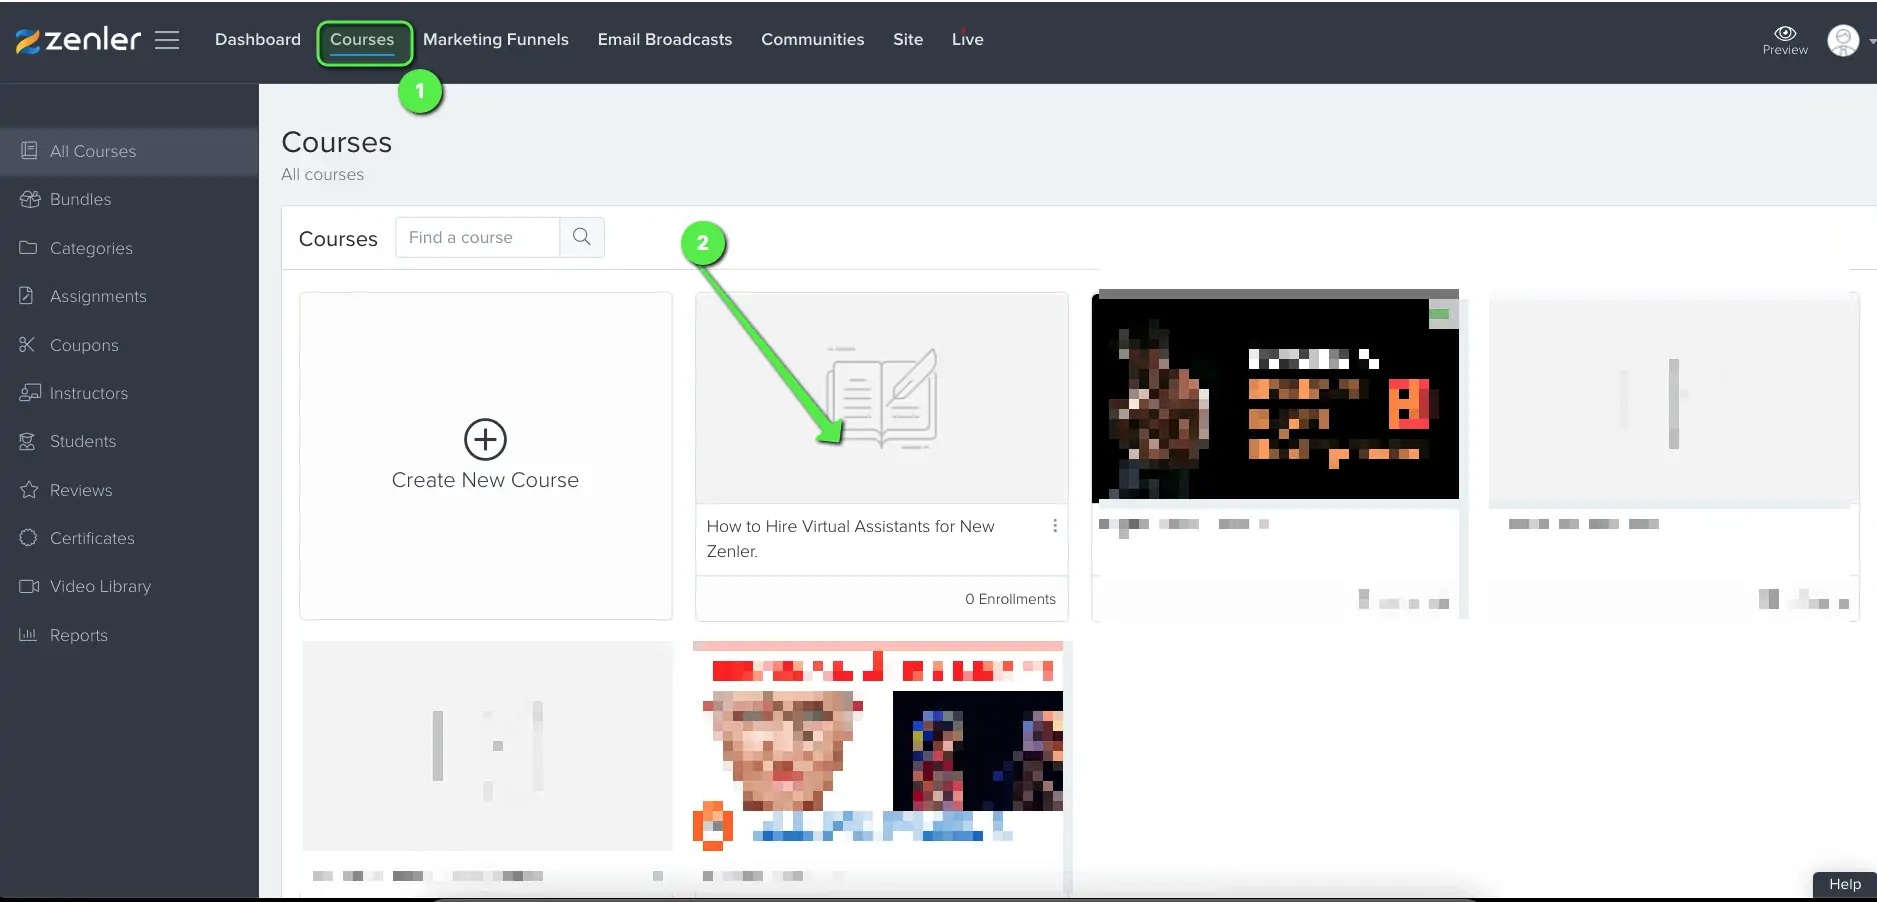
Go to the dashboard and select the course that you want to edit.
Go to the Pricing tab within the course to find the pricing plans that you have set up for the course.
Click on the 'bin' icon to the left to delete it.
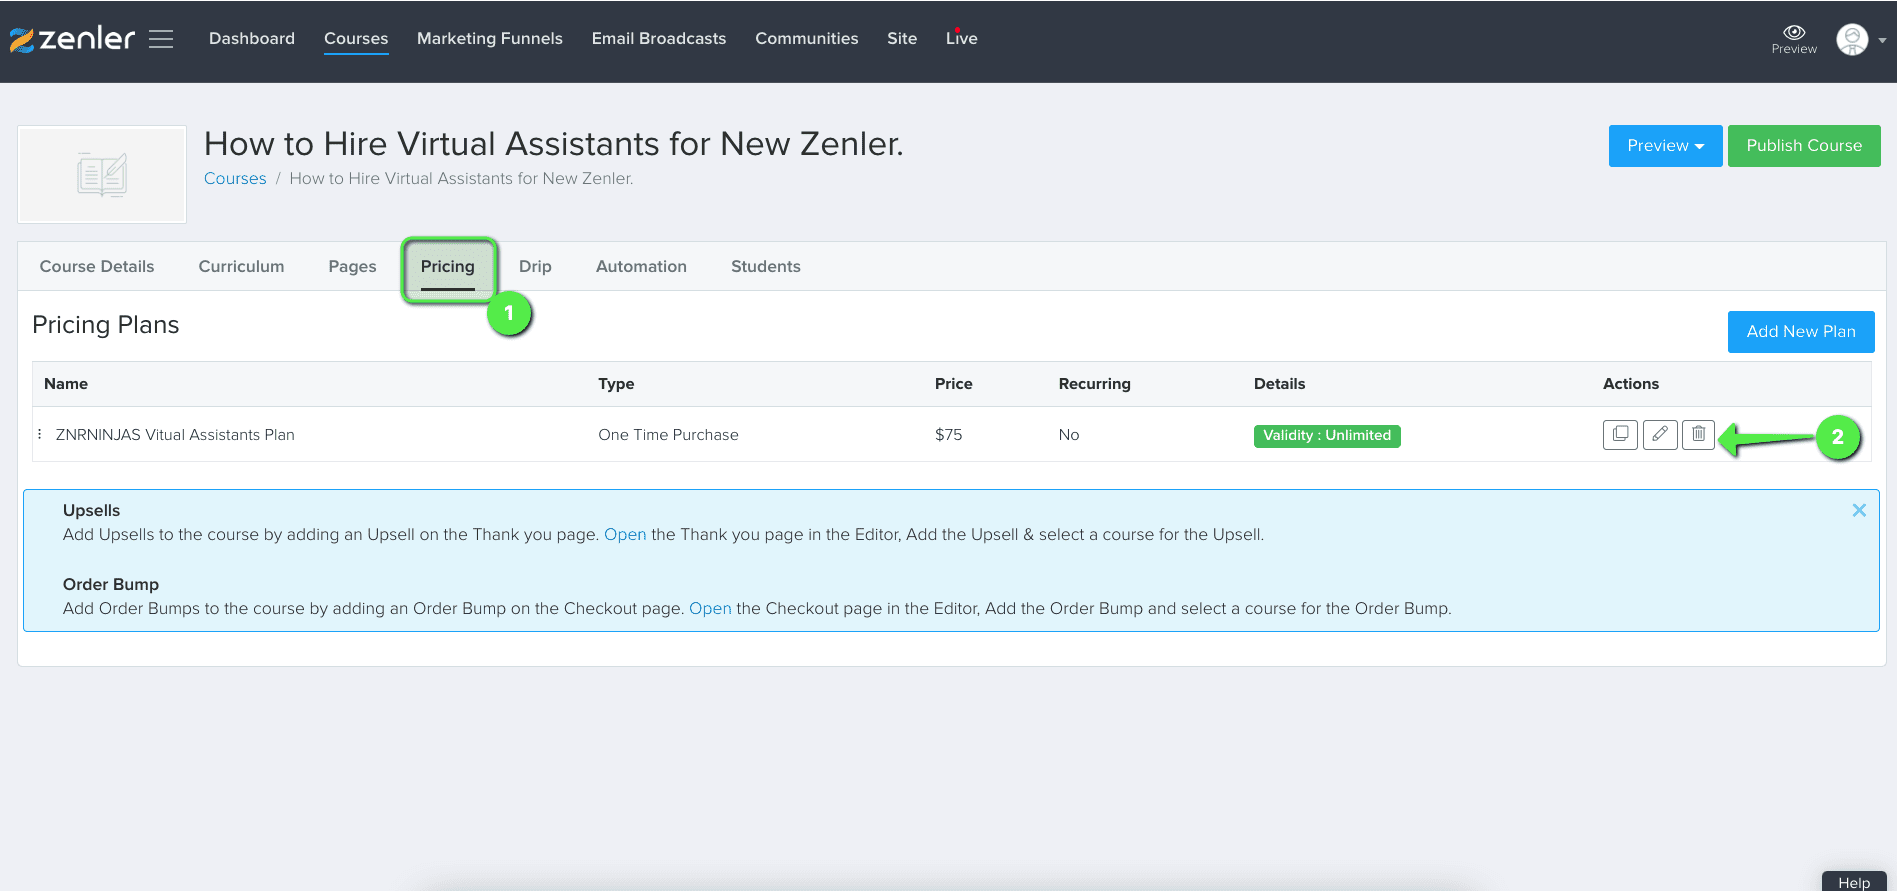
You can also edit the course and set a course validity to the next day's date so that the pricing plan will still be there if you want to use it in the future, but the enrolment will remain closed after the set date.
Join New Zenler Through My Link To Get 10+ Amazing Bonuses.
Step 2: Updating button actions on the sales page.
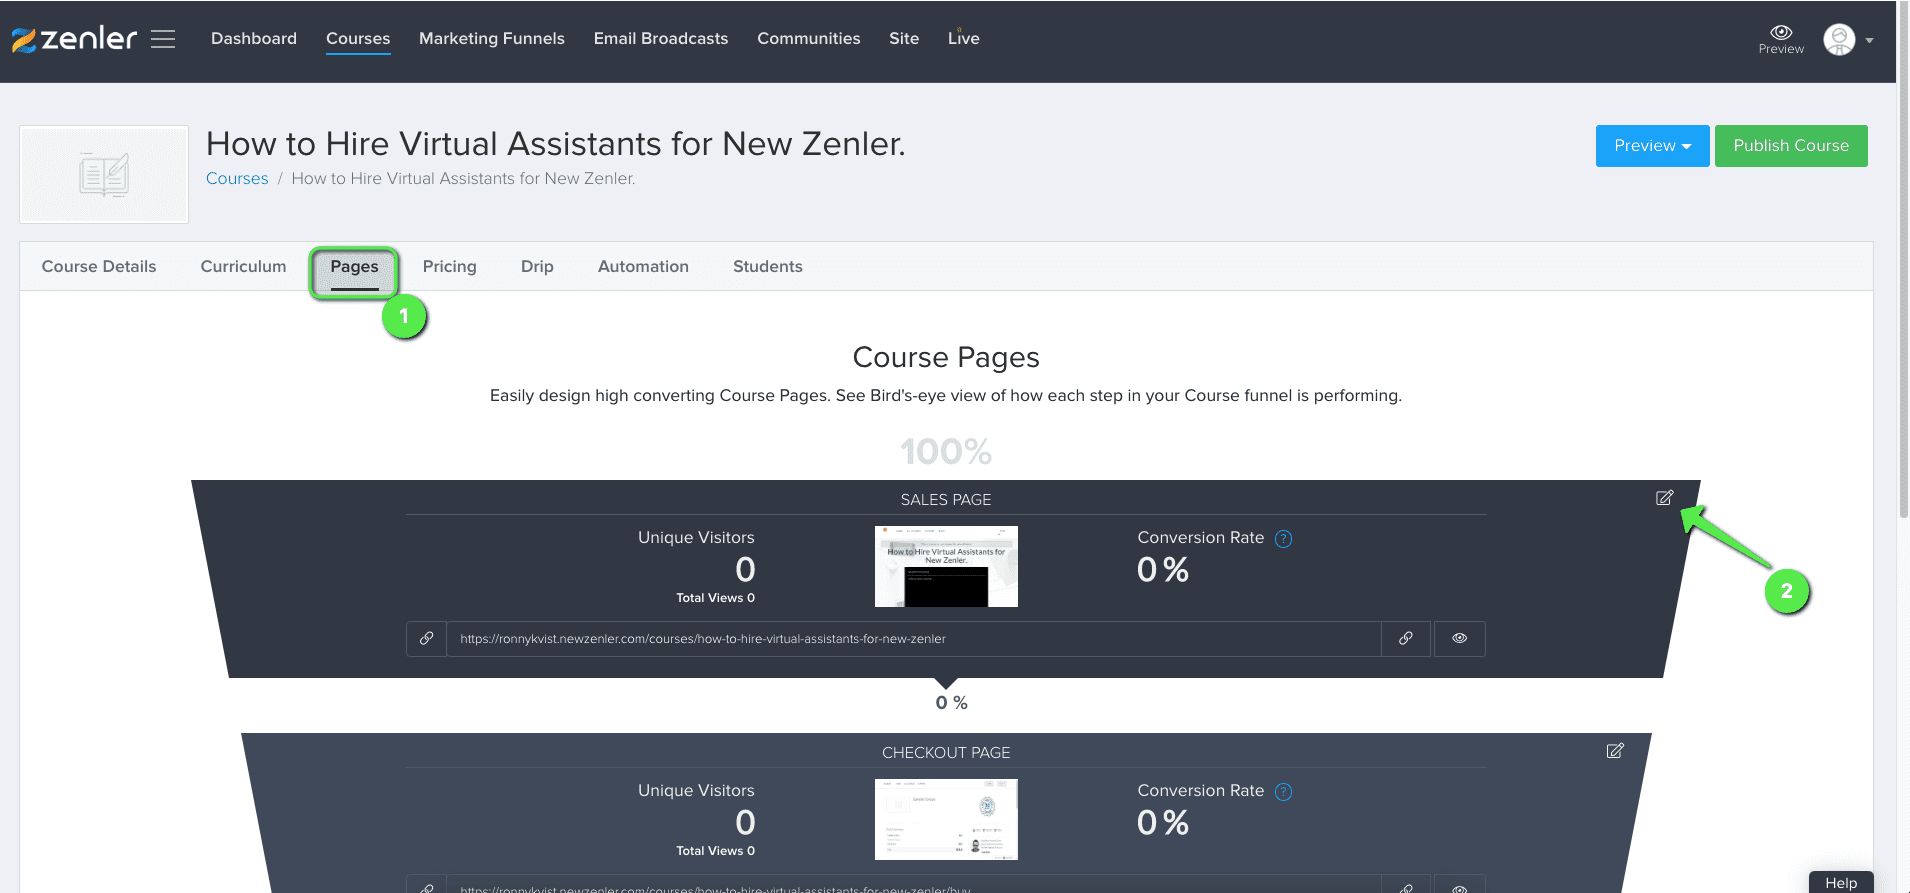
Go to the Pages section for the course and open the Sales Page in the editor mode.
On the sales page, wherever you have a button pointing towards the checkout page (The buttons that visitors click to buy the course. By default you will have one or two, if you have modified the page design and have more buttons, you have to make the change to all of it), click on the button and click on the settings icon for the button.
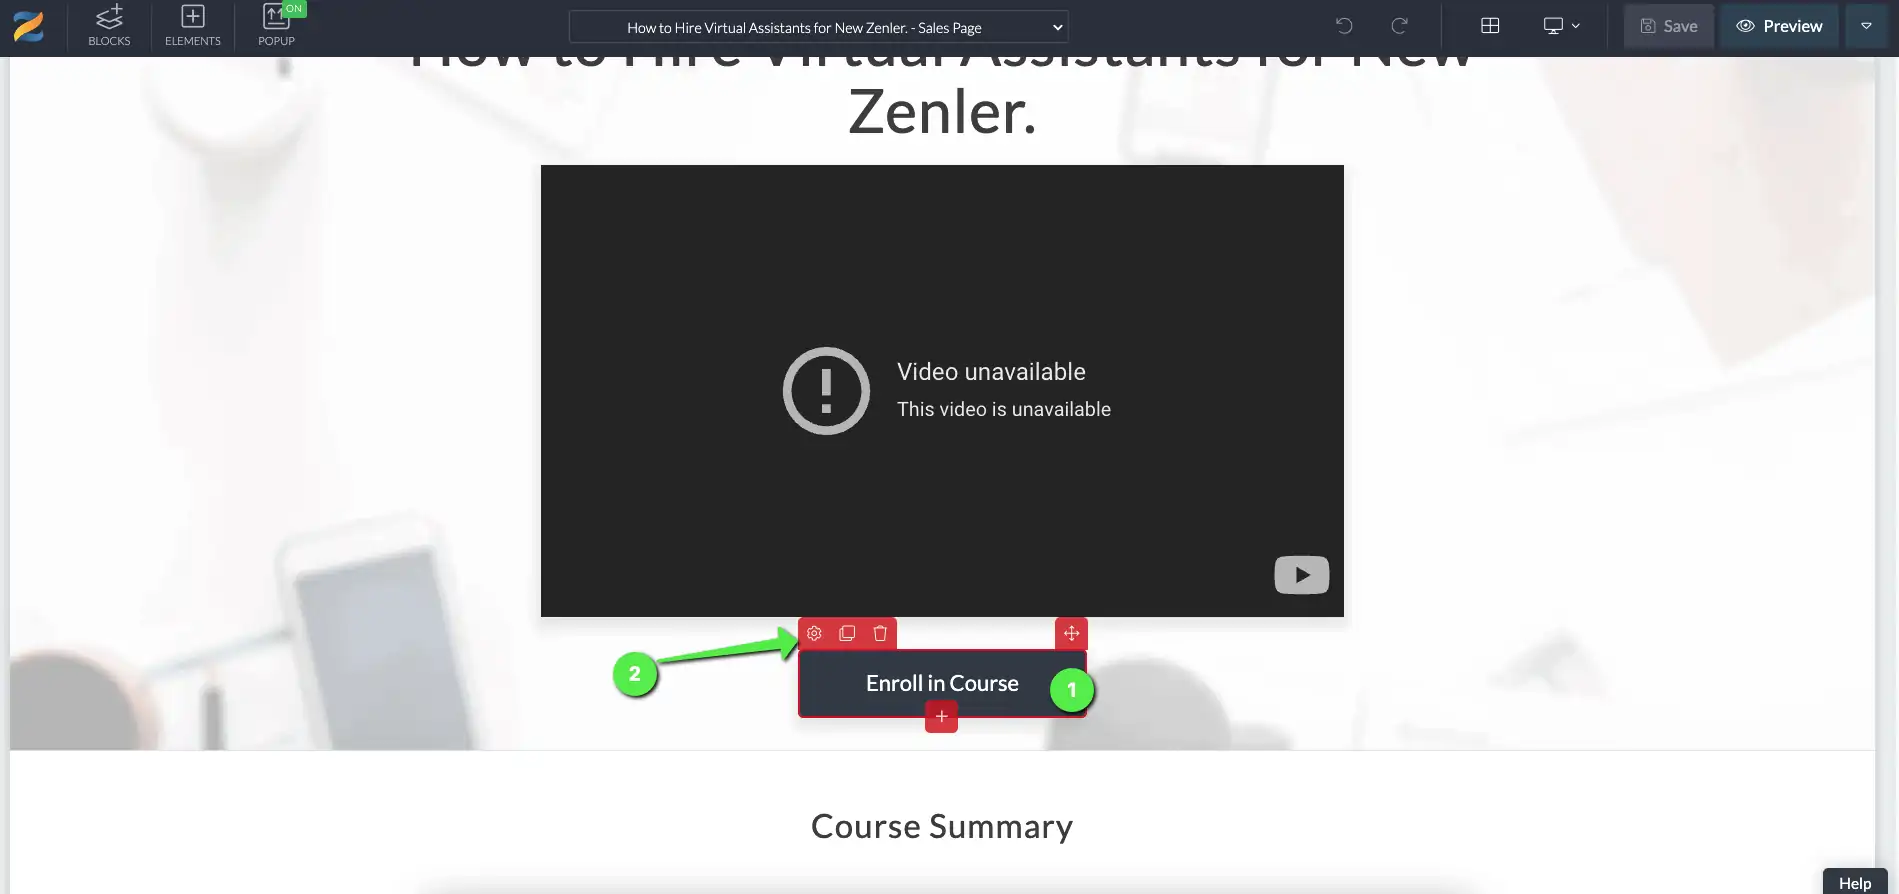
The settings for the button will appear on the right side of the screen, click on the settings tab within that panel to access the action of the button.
If the course is open, the action might be set to go to a link or a page. We need to change it to open the pop-up. Select the option for opening the pop-up from the drop-down and save the changes.
Also, make sure that you change the button text to say something like "Join Waitlist" or "Get Notified".
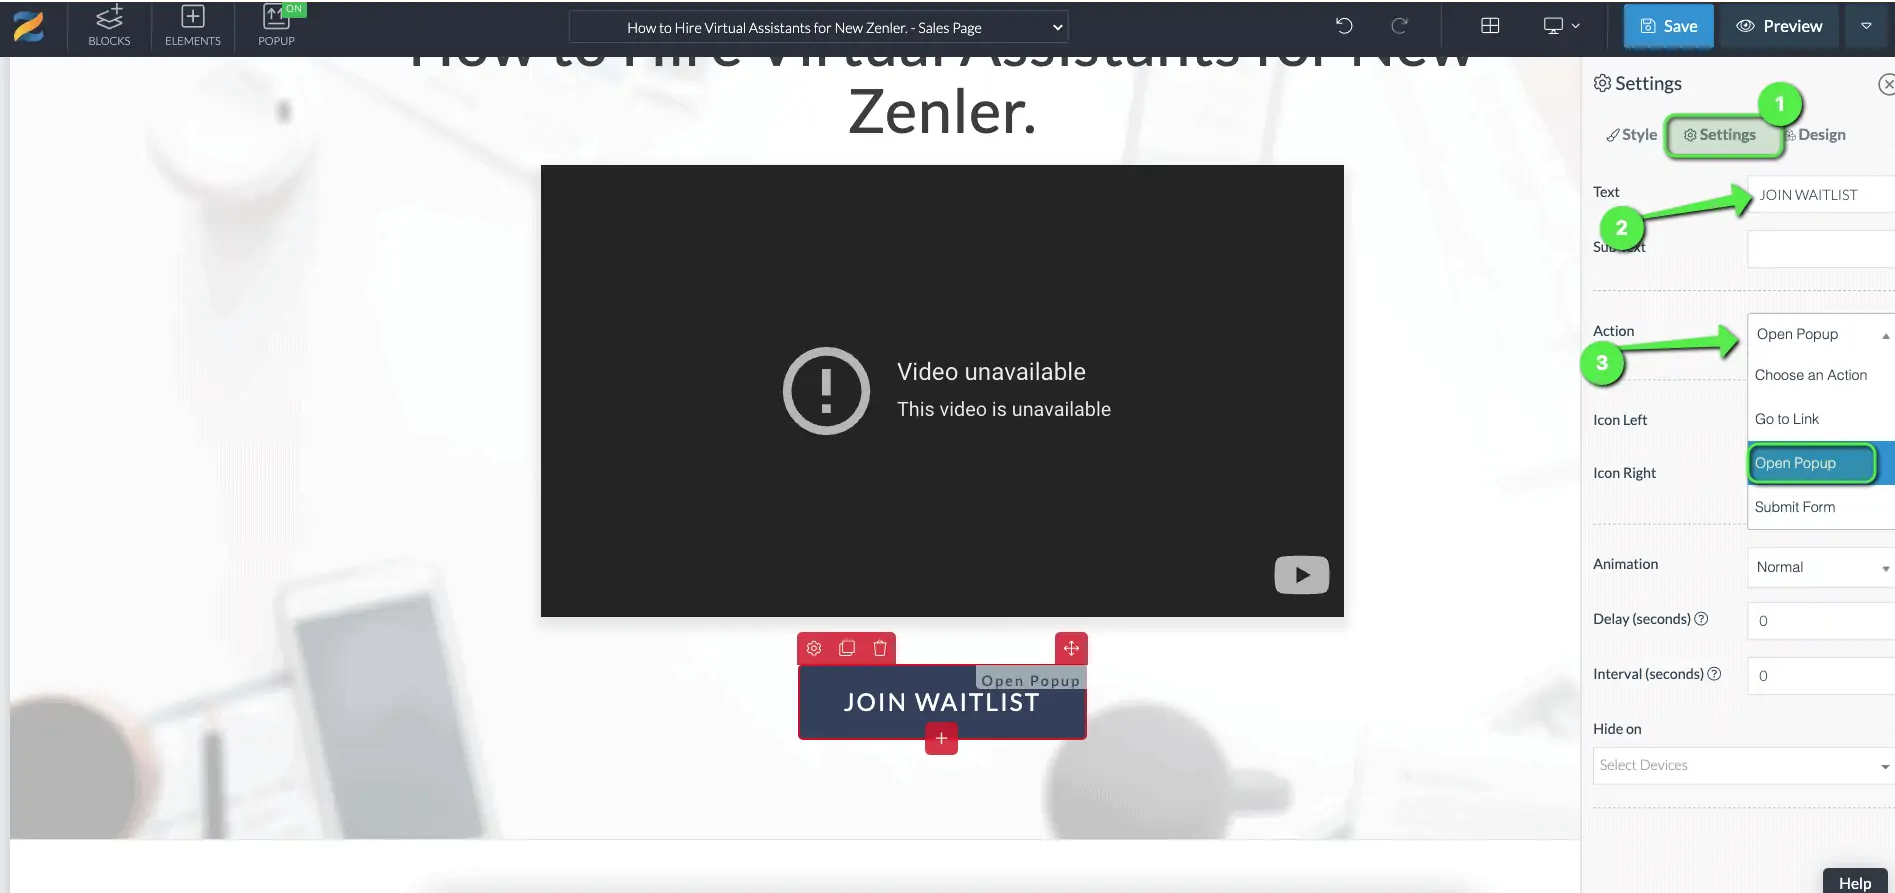
If you are sing the default layout for the sales page, you will have to delete the button and then add a new button to access these settings.
Also, you need to make the same change to all the buttons that take people to the payment page.
Next, we will create the funnel, which will start from the pop-up.
Join New Zenler
Full featured free trial. No Credit Card Required. Create your free school today!
Task 2: Create a marketing funnel for the waitlist.
Step 1: Create a marketing funnel.
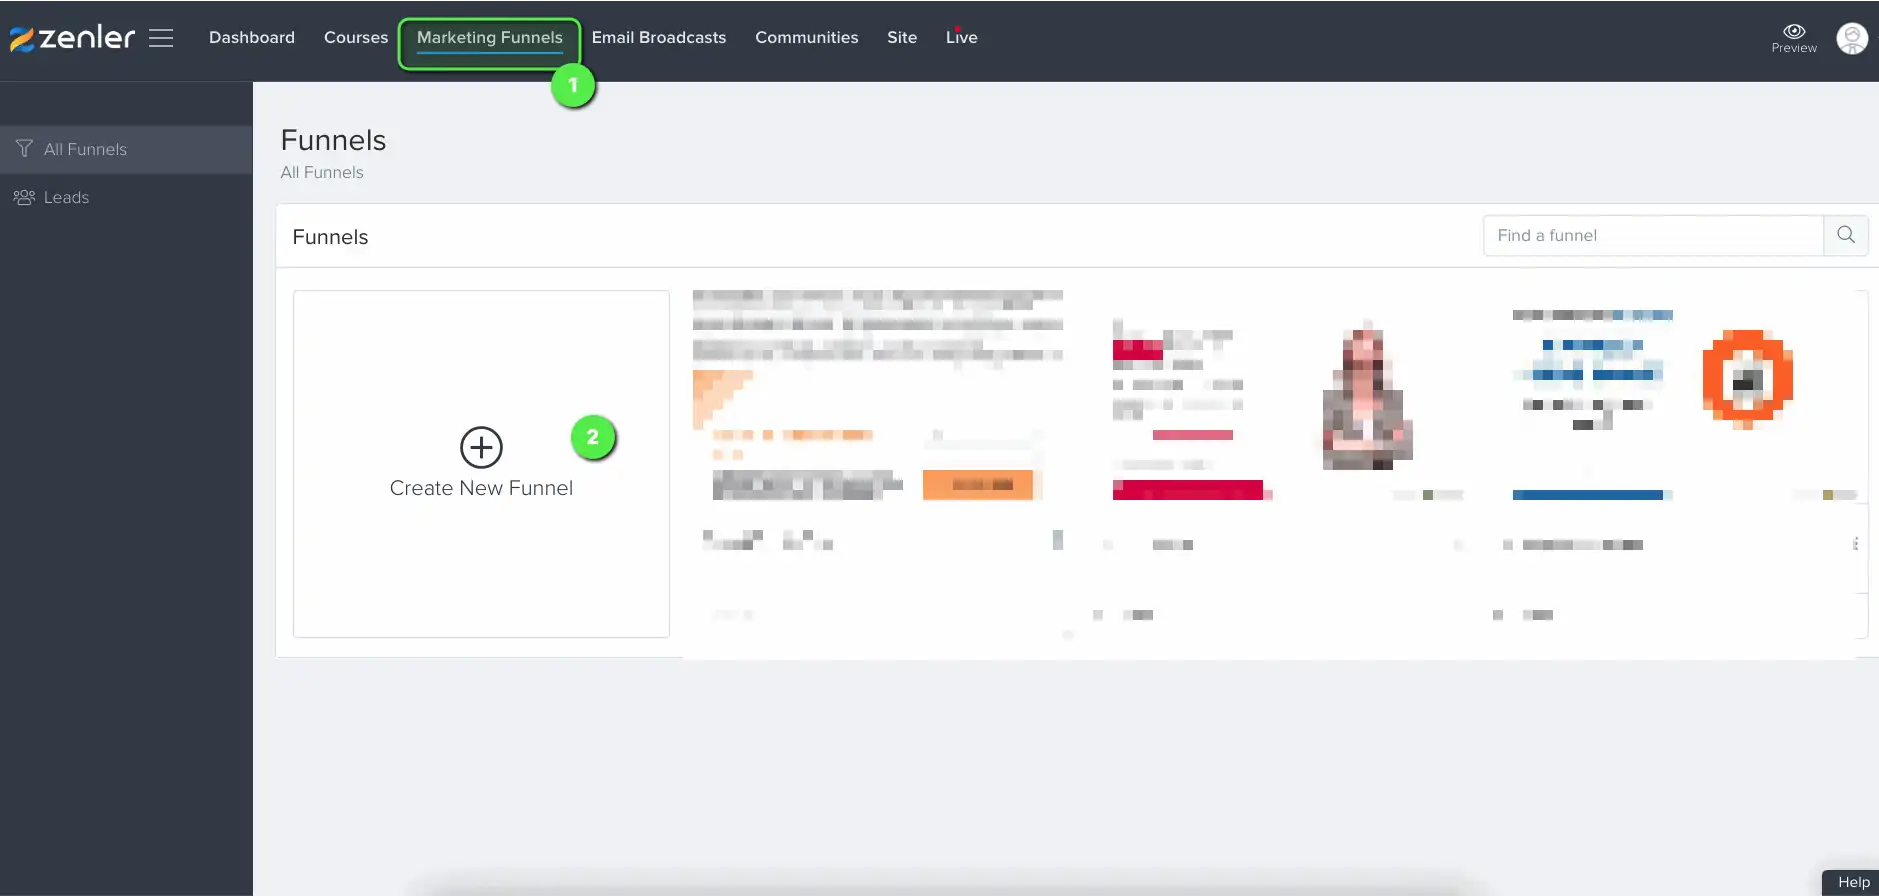
To create the waitlist funnel, go to the marketing funnels tab on your site and click the "+" icon to create a new funnel.
Select the "Lead Magnet" option next and then move on to give a name for the funnel.
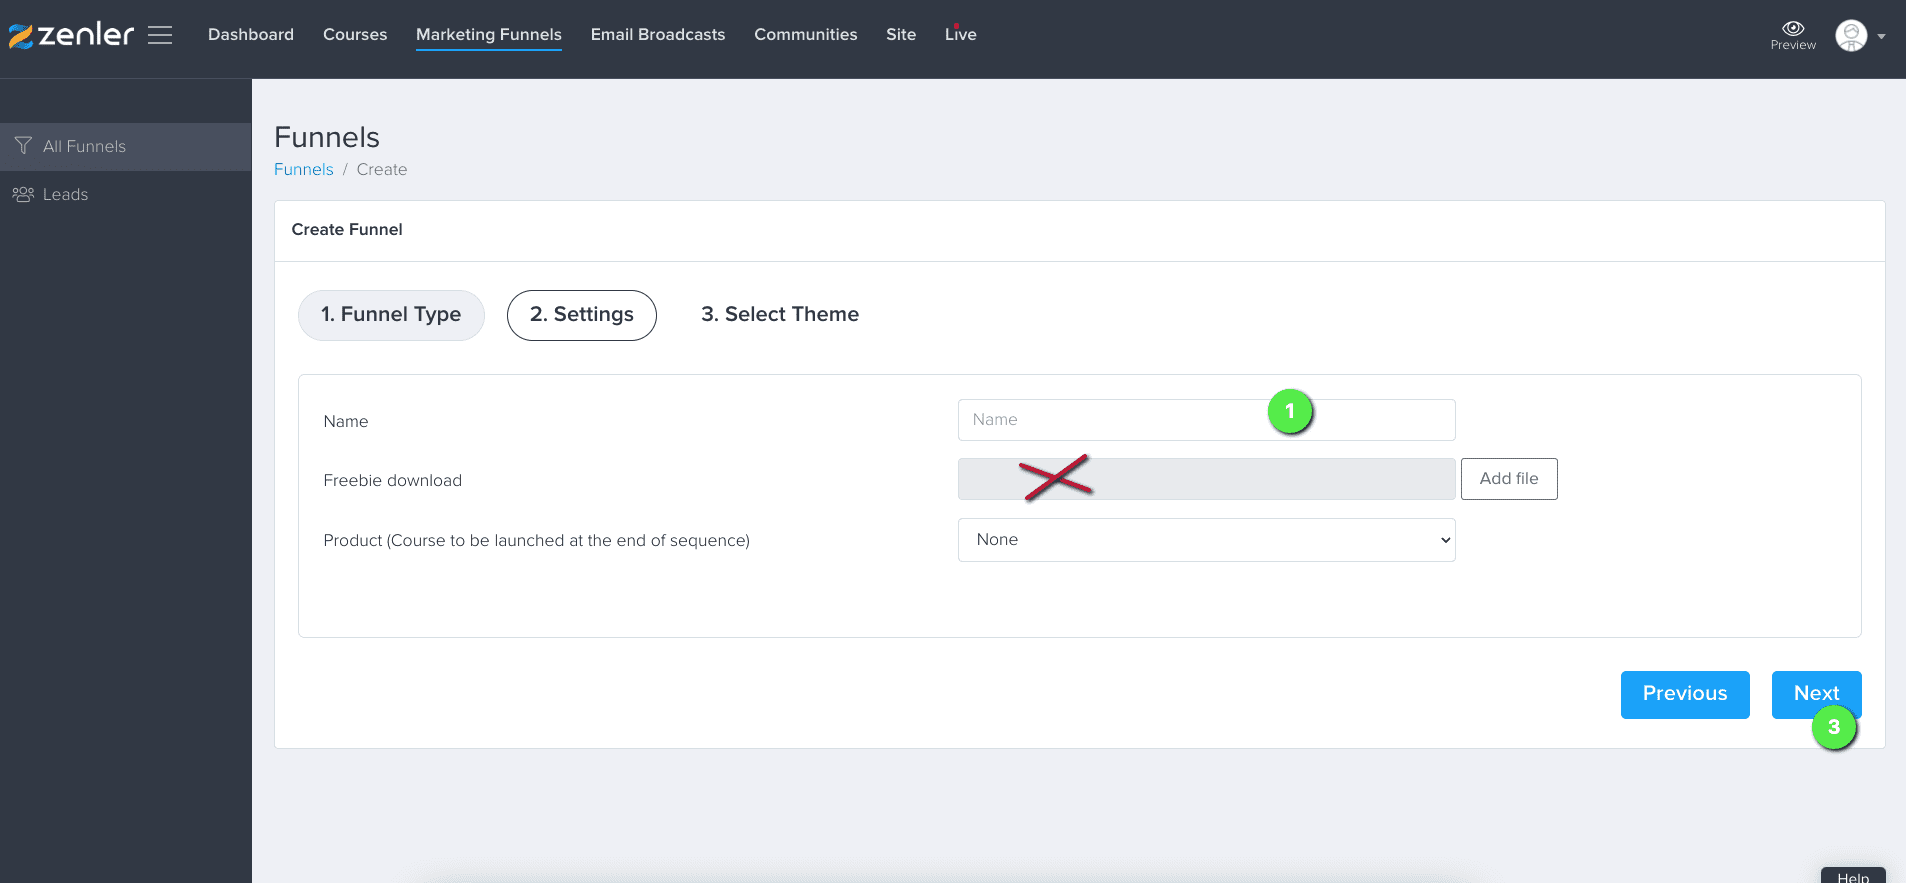
You can ignore the add product option. We are just going to use the "Automations" part of the funnel so the pages/steps are not really important here.
Step 2: Linking the waitlist funnel and the course.
Now that you have a marketing funnel for your leads, it is time to link the course and the funnel together.
Same as before, open the sales page in the editor and click on the pop-up option at the top.
Click on the toggle on the right-side panel to enable the pop-up.
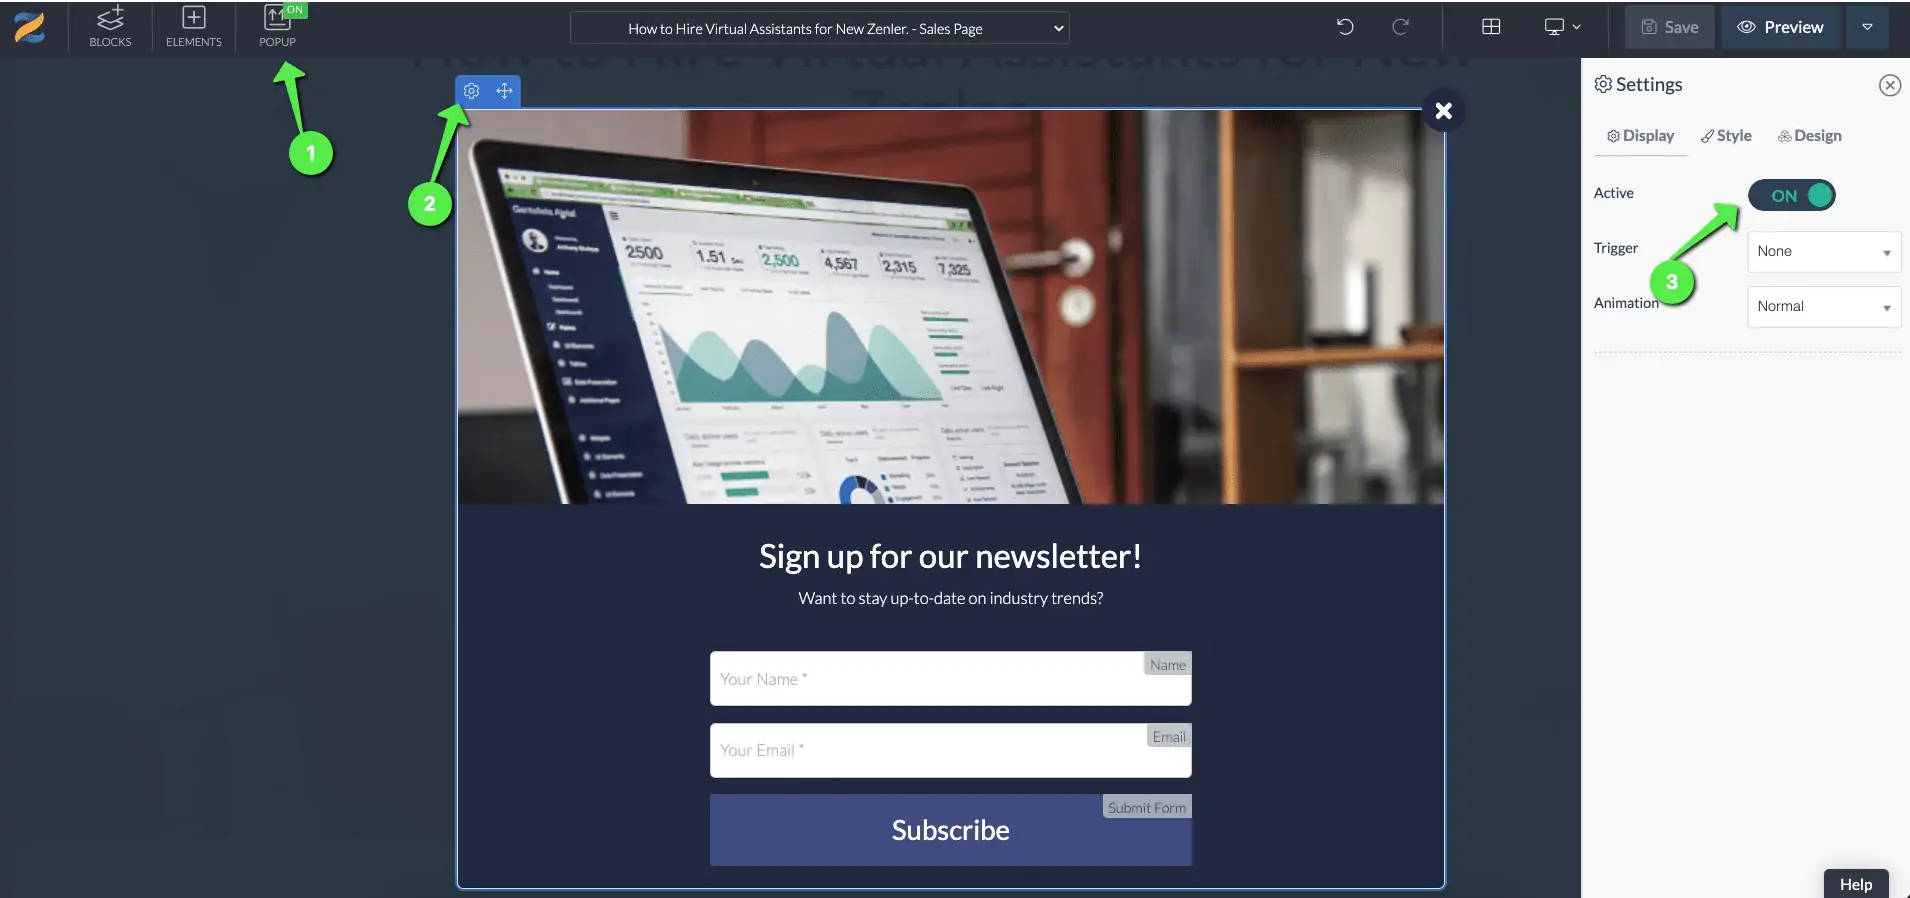
This pop-up is where all the leads put in their name and email to join the waitlist. So you can adjust the layout, colours, text, etc according to your site's branding.
Once you have modified the pop-up to match your site, click on the button (The submit button which should add them to the waitlist), and go to its settings.
You need to make a few changes here to link the funnel and the course:
- Set Action to "Submit Form"
- Select the marketing funnel that you have created in the "Add to funnels" section.
- Set the "Post Submit" action to go to a page (This is optional, you can create a thank you page and add its link here so that people will be taken to that thank you page after joining the waitlist. This can be created as a regular page under Site -> Pages)
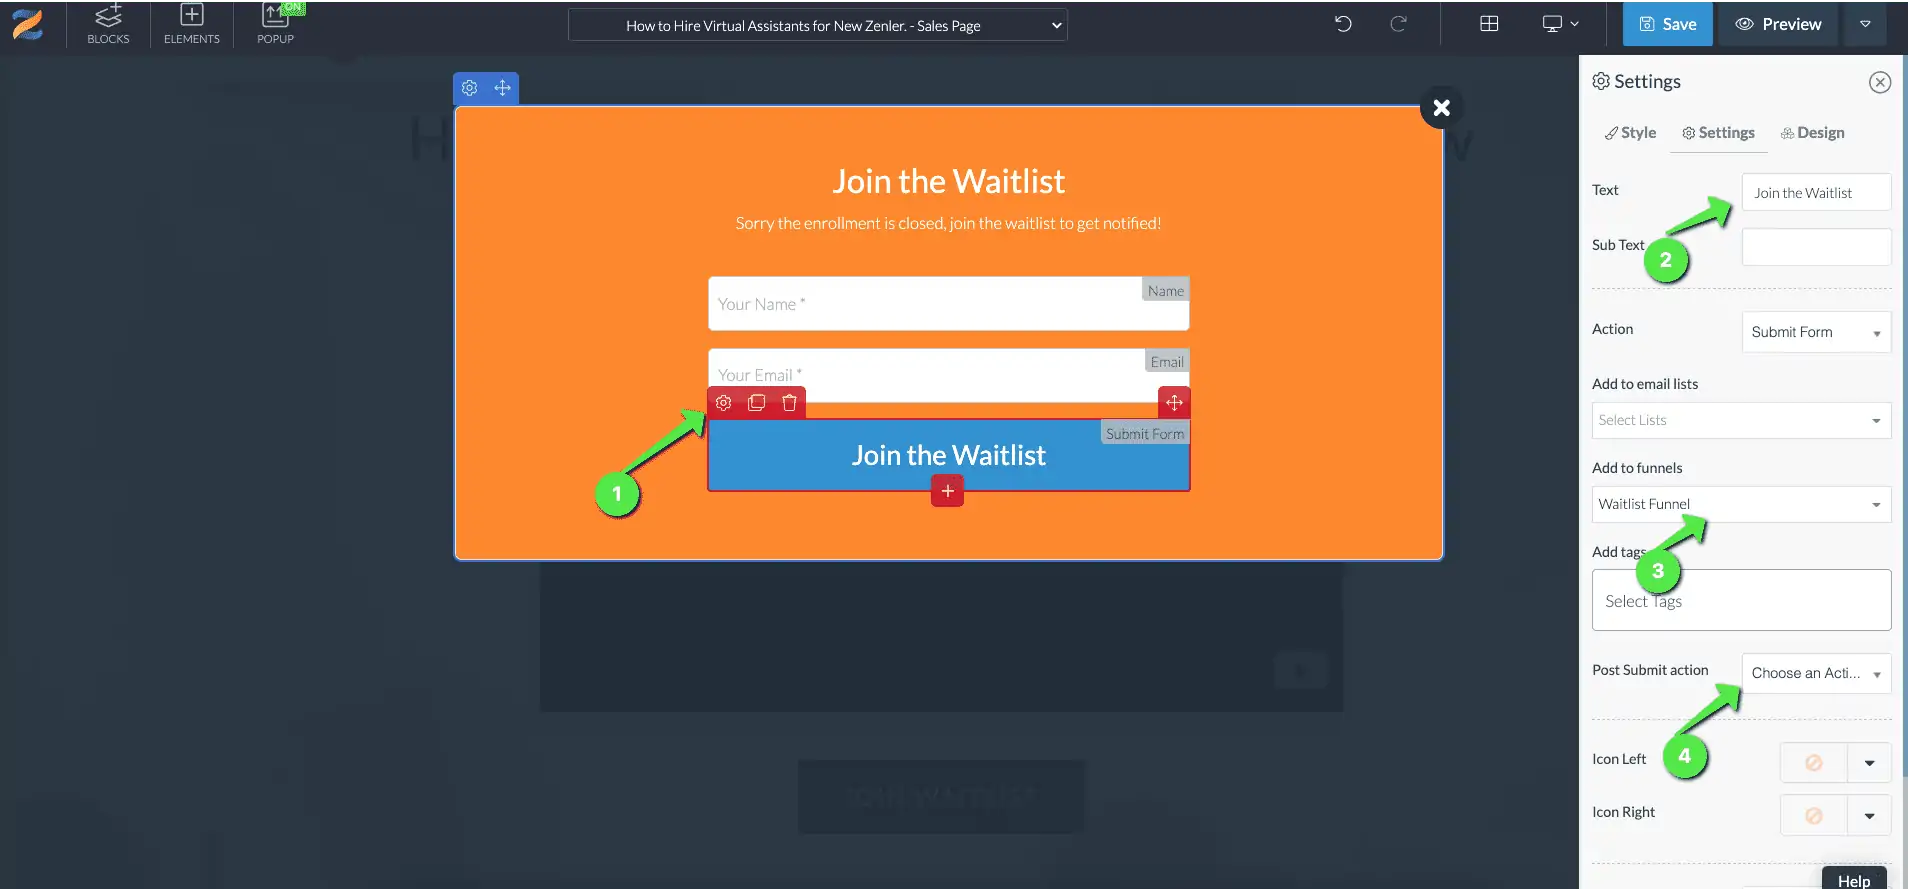
That's it. Now people who click on the "Join Waitlist" button from the sales page will be presented with the pop-up where they can put in their name and email to join the waitlist and after submitting, they will be taken to the thank you page if you have that set up.
On the back end, all these people who join the waitlist from the sales page will be added to the marketing funnel that you have created. So you can add email sequences under its automation section based on your email marketing strategy.
Task 3: Re-opening the course for enrolment.
Once you have enough people on the waitlist or you have finished making changes to the course, you can re-open the course for enrolment and send out a notification to the people on the waitlist.
Step 1: Adding the pricing plan back
To add the pricing options back, go to the pricing tab of the course as mentioned previously and click on the "Add New Plan" option to add the new pricing plan.
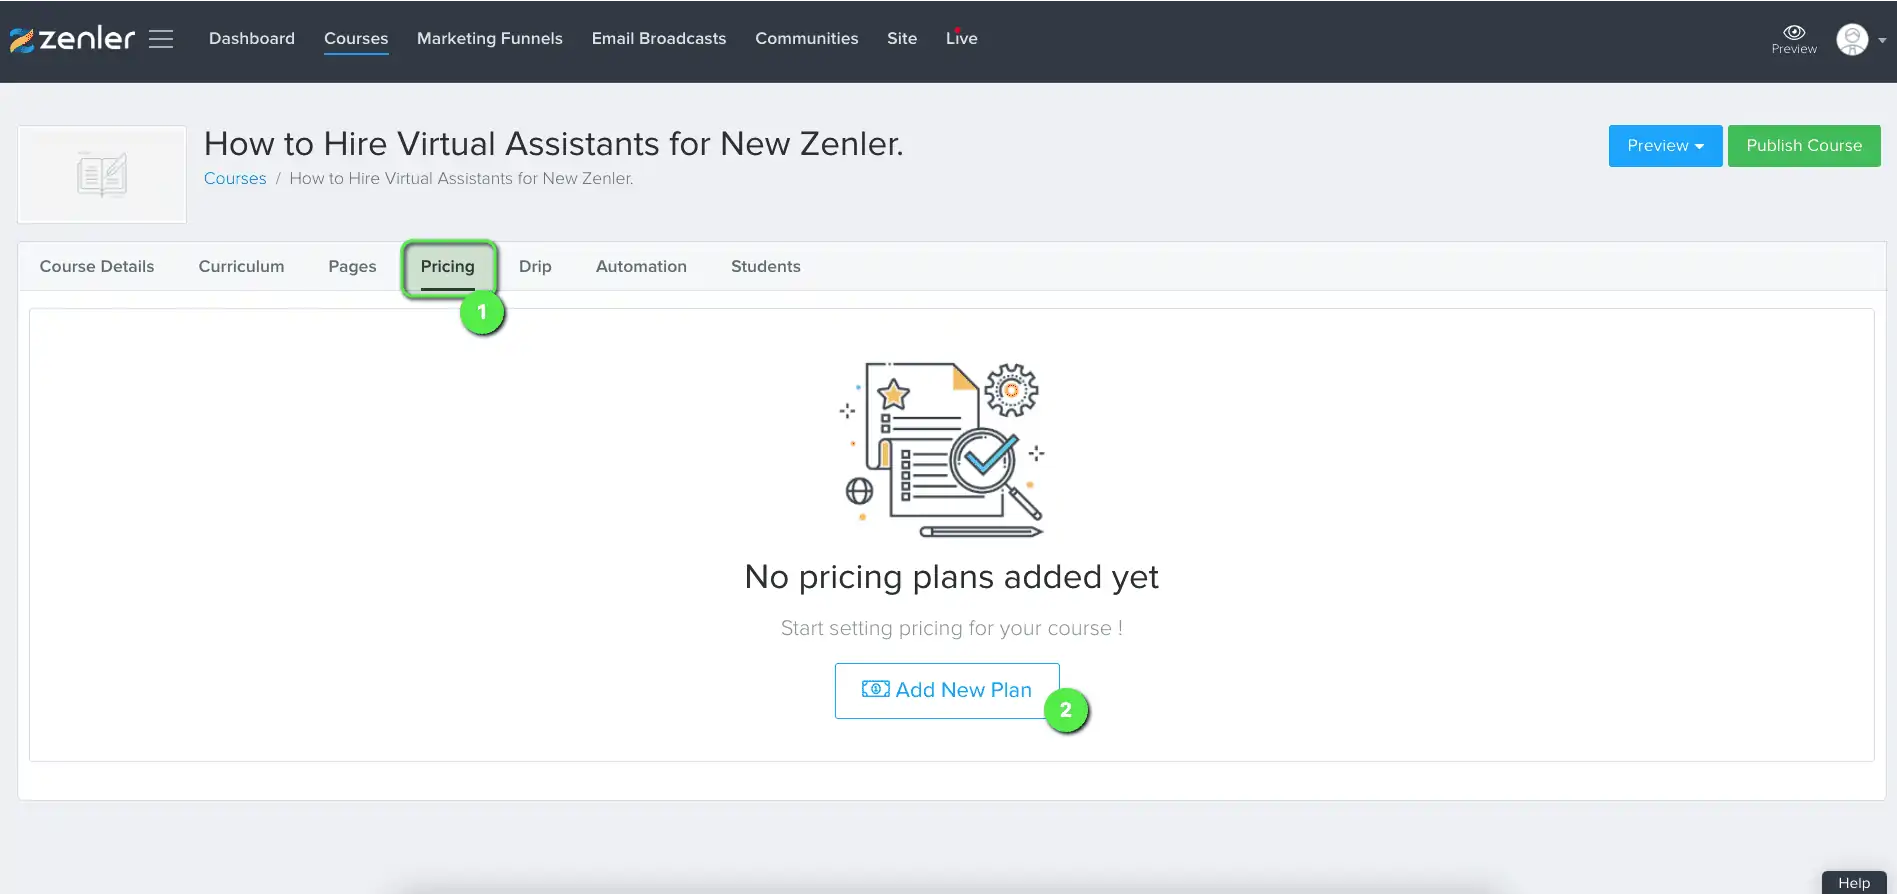
If you did not delete the plan and just set the availability previously, you can edit that plan and disable the availability option to continue using the same plan. By making this change, that plan will become active again.
Step 2: Unlink the marketing funnel from the course.
Go to the pages tab of the course and copy the URL to the payments page. This page will be the second page in the list called "Checkout Page".
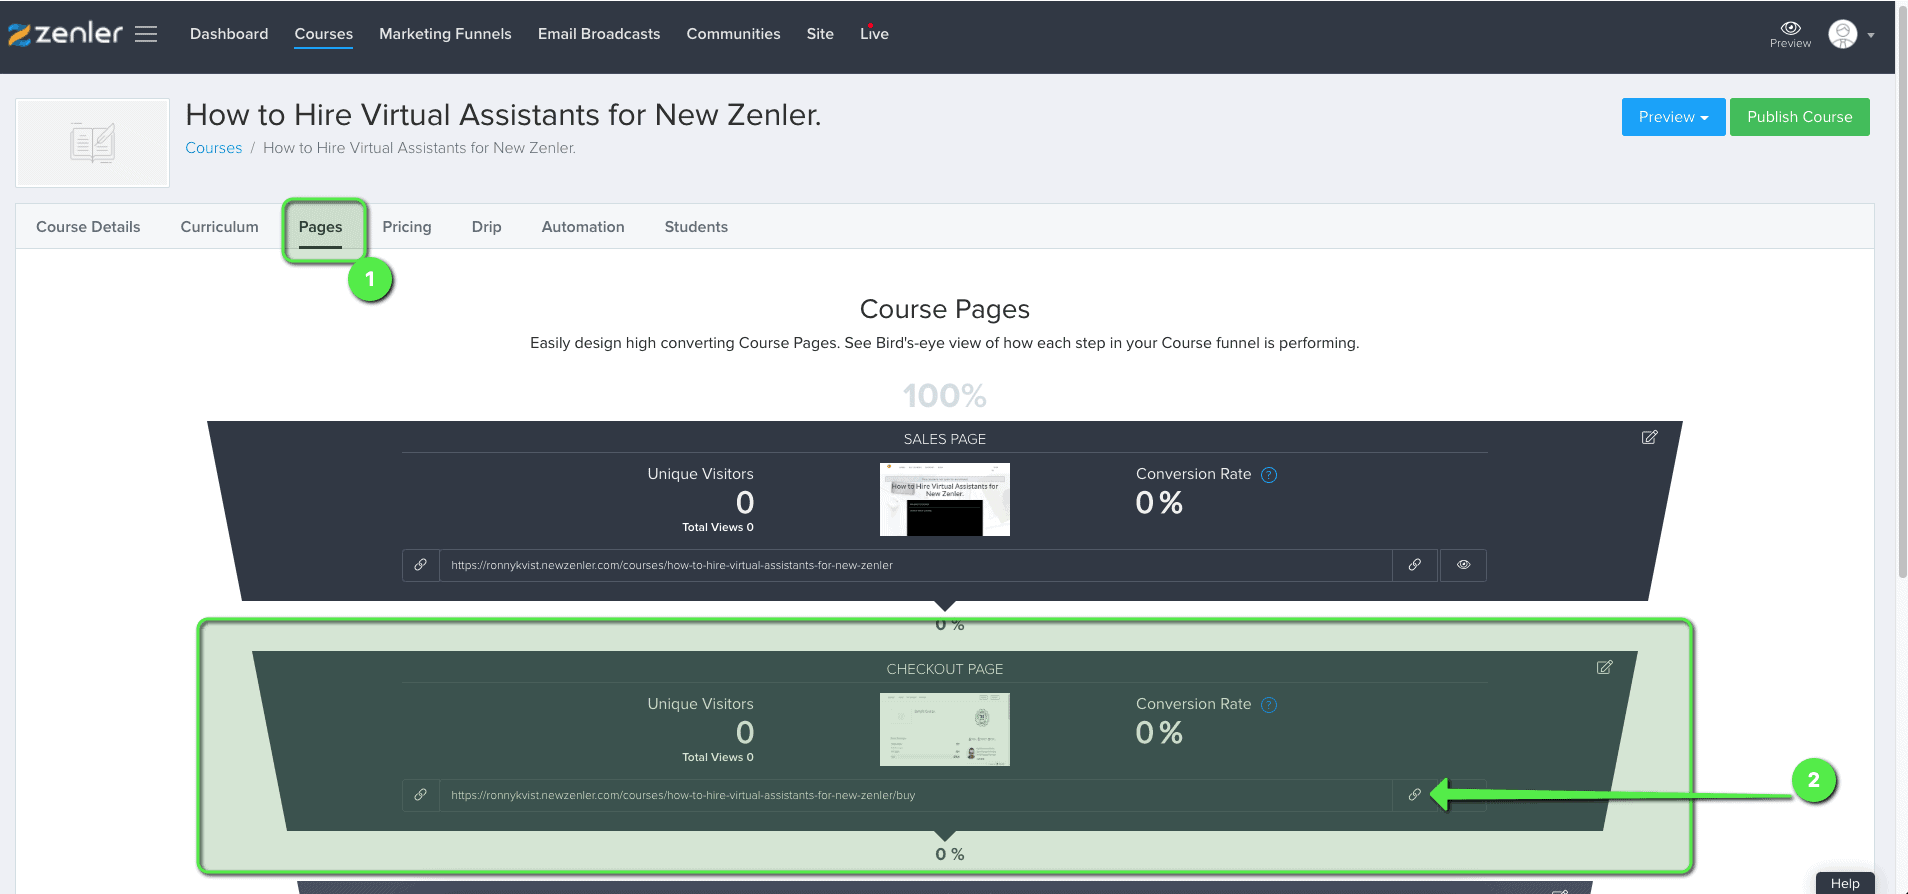
To bring back the payment page, open the sales page in the editor and go to the settings for the "Join Waitlist" button.
Set the action back to "Go to link" and paste the URL of the checkout page that you copied earlier in the text box.
Make sure to change the button text back to say "Enroll Now" or "Join Now".
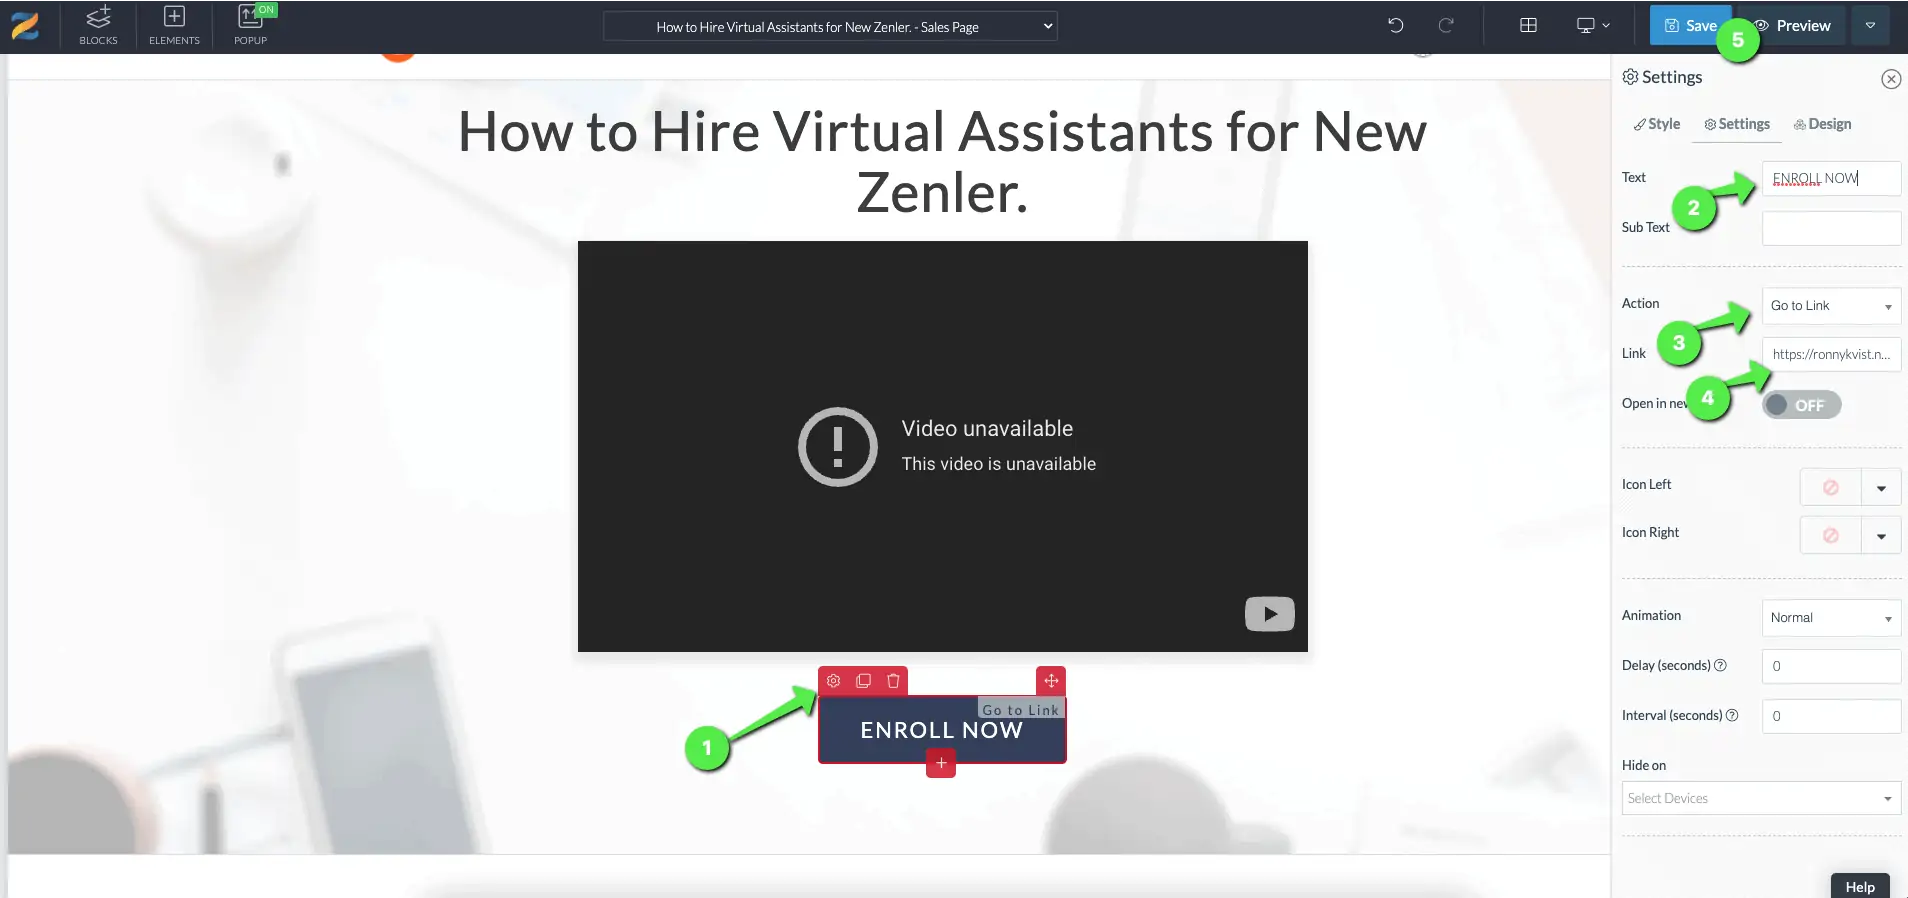
Make this change to every button on the page which goes to the waitlist and that is it!! Now the course is open for enrolment.
Join New Zenler
Full featured free trial. No Credit Card Required. Create your free school today!
Step 3: Notifying the leads on the waitlist about the course.
Once the course is back Live, it is important to notify the people on the waitlist and make some sales.
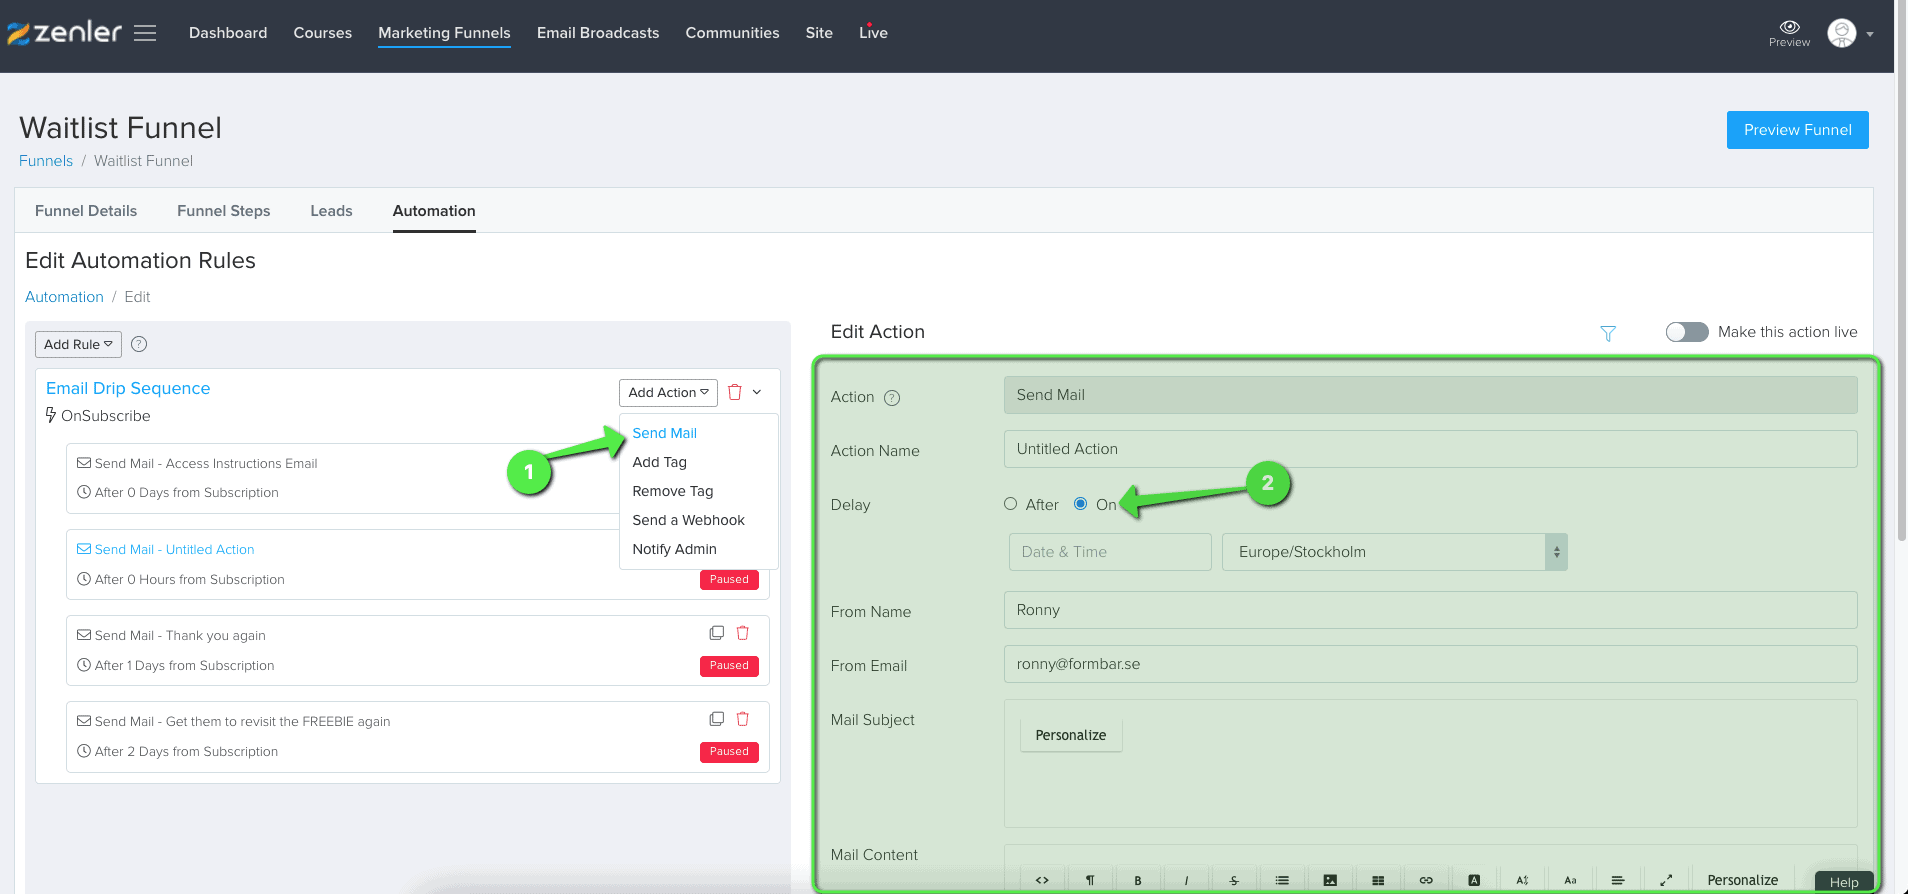
The people on the waitlist are added to the marketing funnels as leads. So you can go to the "Automations" section of the marketing funnel and add an email to go on a specific date with the content saying about the course and a link to the sales page where they can know more and sign up for the course.
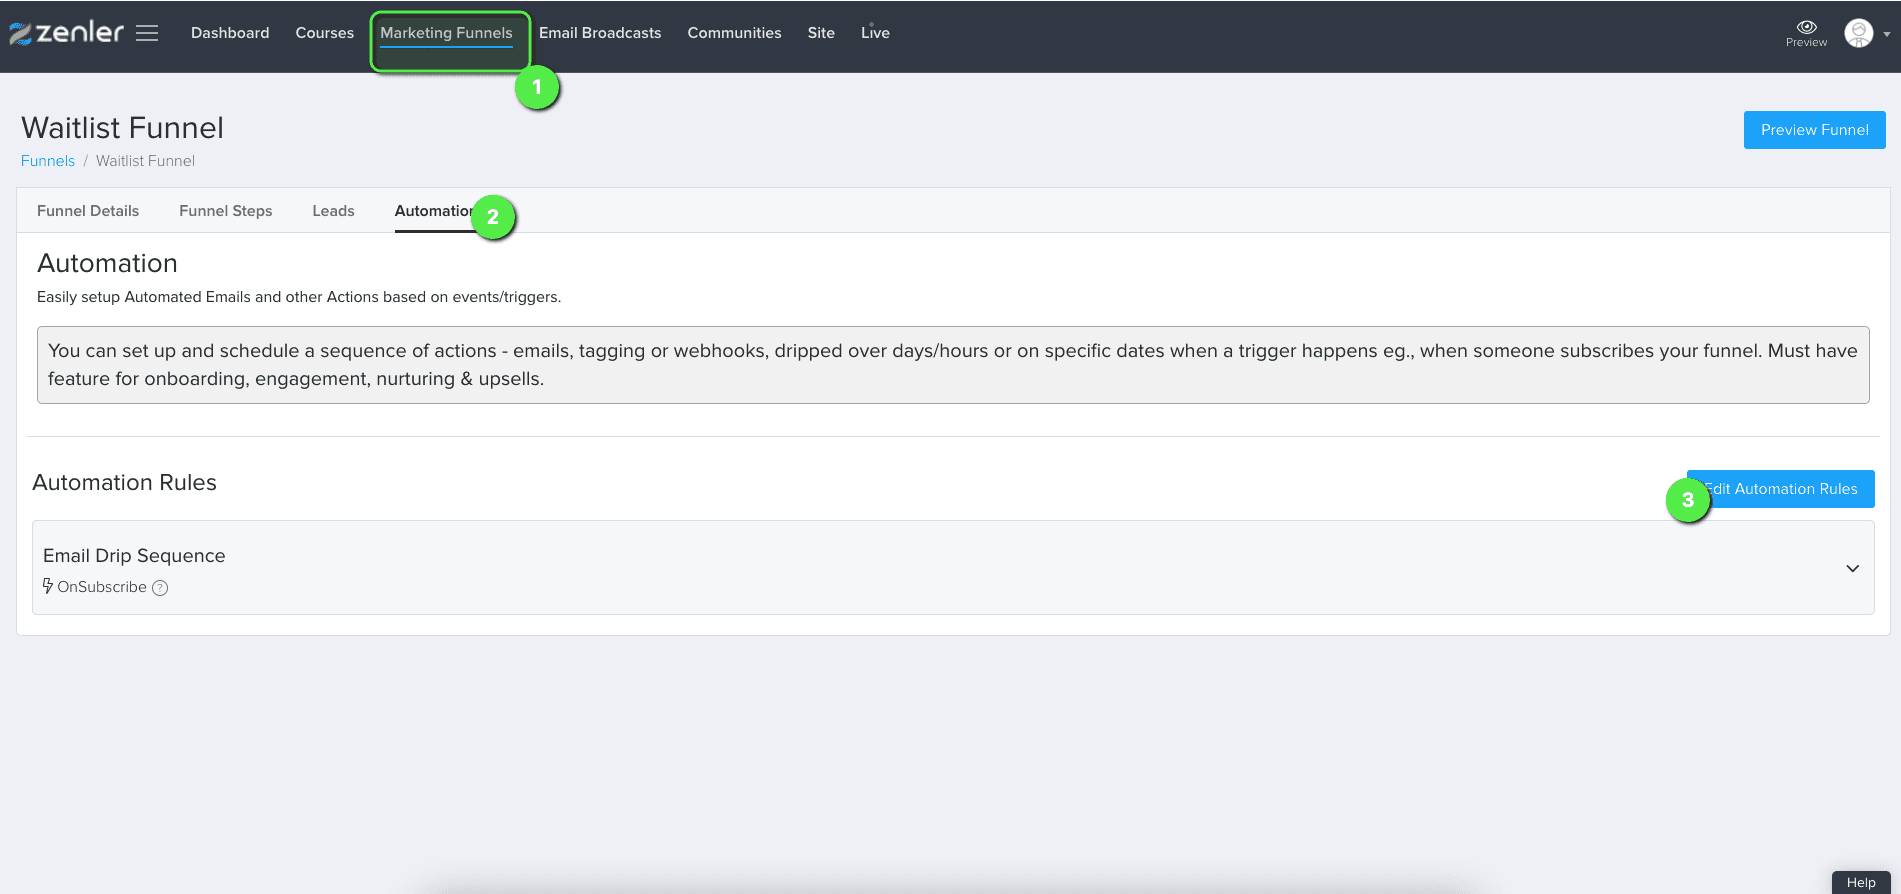
In the "Automations" section, you can add a "Send Mail" action and edit the subject, content, and date on when the email will be triggered.
Voila!! That is all.
You have learned to create a waitlist for your course. Wishing you all the best for your courses. I will be back with another exciting tutorial that no one knows about.
